


While our focus at Best Slow Cooker often revolves around hearty, set-it-and-forget-it meals, the holiday season calls for a different kind of warmth and magic. There’s something undeniably special about the scent of freshly baked Christmas cookies filling your home, creating an ambiance of pure joy and nostalgia that complements any festive spread. These soft Christmas cookies are the perfect counterpart to those comforting slow-cooked dinners, offering a sweet, spiced indulgence that’s surprisingly simple to achieve. Imagine a tender, subtly spiced cookie melting in your mouth, adorned with a sweet glaze – a bite of pure holiday bliss. This recipe is designed to be approachable for everyone, ensuring you can whip up a batch of these crowd-pleasing treats with minimal fuss. Get ready to create delicious memories and fill your festive table with these irresistible bites!
Equipment Needed
- Large mixing bowls
- Electric mixer (stand or hand-held)
- Measuring cups and spoons
- Rolling pin
- Christmas cookie cutters
- Baking sheets
- Parchment paper or silicone baking mats
- Wire cooling rack
- Spatula
Ingredients
- 1 cup (2 sticks) unsalted butter, softened
- 1 1/2 cups granulated sugar
- 2 large eggs
- 1 teaspoon vanilla extract
- 3 cups all-purpose flour
- 1 teaspoon baking powder
- 1/2 teaspoon salt
- 1/2 teaspoon ground cinnamon
- 1/4 teaspoon ground nutmeg
- 1/4 teaspoon ground cloves
- For the Glaze:
- 2 cups powdered sugar
- 3-4 tablespoons milk (or water)
- 1/2 teaspoon vanilla extract
- Optional: Food coloring, sprinkles for decoration
Instructions
- In a large bowl, cream together the softened butter and granulated sugar with an electric mixer until light and fluffy, about 3-4 minutes.
- Beat in the eggs one at a time, mixing well after each addition. Stir in the vanilla extract.
- In a separate bowl, whisk together the flour, baking powder, salt, cinnamon, nutmeg, and cloves.
- Gradually add the dry ingredients to the wet ingredients, mixing on low speed until just combined. Do not overmix.
- Divide the dough into two equal portions, flatten each into a disc, wrap tightly in plastic wrap, and refrigerate for at least 1 hour (or up to 2 days) to chill thoroughly.
- Preheat your oven to 375°F (190°C). Line baking sheets with parchment paper or silicone baking mats.
- On a lightly floured surface, roll out one disc of dough to about 1/4 inch thickness. Use your favorite Christmas cookie cutters to cut out shapes.
- Carefully transfer the cut-out cookies to the prepared baking sheets, leaving about 1 inch between them.
- Bake for 8-10 minutes, or until the edges are lightly golden. Do not overbake to keep them soft.
- Let the cookies cool on the baking sheet for 5 minutes before transferring them to a wire rack to cool completely.
- While the cookies cool, prepare the glaze: In a small bowl, whisk together the powdered sugar, milk, and vanilla extract until smooth. Add more milk if needed for a thinner consistency, or more powdered sugar for a thicker one.
- Once the cookies are completely cool, drizzle or spread the glaze over them. Decorate with sprinkles immediately if desired, before the glaze sets.
- Let the glaze set completely before stacking or storing the cookies.
Tips & Variations
- **The Secret to Softness:** The golden rule for these cookies is to resist overbaking. Pull them from the oven when the edges are just barely kissed with gold and the centers appear slightly soft. They will firm up beautifully as they cool, retaining that coveted tender crumb.
- **Embrace the Chill:** Don’t rush the chilling process! This crucial step ensures your cookies hold their shape perfectly and allows the delightful blend of spices to deepen, resulting in a richer flavor and superior texture.
- **Spice It Up Your Way:** Feel free to customize the spice profile! A touch of ground ginger can add extra festive warmth, or for a sophisticated twist, a hint of cardamom. A tiny bit of orange or lemon zest can also brighten the overall flavor beautifully.
- **Deck the Halls (of your cookies!):** Have fun with the decorations! Split your glaze and add various food colorings for a vibrant spread, or bring out different festive sprinkles to make each cookie a tiny work of art. The possibilities are endless!
- **A Note on Storage:** To keep these cookies at their peak softness, store them in an airtight container at room temperature. For an extra touch of moisture, you can even place a slice of bread in the container; the cookies will absorb moisture from the bread and stay softer longer.
Serving & Storage Suggestions
These delightful soft Christmas cookies are the perfect complement to any holiday occasion, whether it’s a cozy family evening after a delicious slow-cooked meal or a bustling festive party. Arrange them artfully on a vintage platter alongside steaming mugs of hot cocoa, a robust coffee, or a comforting spiced cider. They also make truly thoughtful homemade gifts, beautifully packaged in festive tins tied with a bow. When it comes to storage, these cookies maintain their sublime texture wonderfully in an airtight container at room temperature for up to a week. For longer enjoyment, the undecorated cookies freeze exceptionally well for up to three months; simply thaw and glaze when you’re ready to serve.
There you have it – the recipe for truly irresistible soft Christmas cookies, destined to bring smiles and sweet cheer to your holiday table! We hope these become a cherished part of your festive baking traditions, perhaps even complementing a hearty slow cooker feast. We’d love to hear how yours turn out, so please share your thoughts and any creative decorating ideas in the comments below!
soft Chritmas cookies
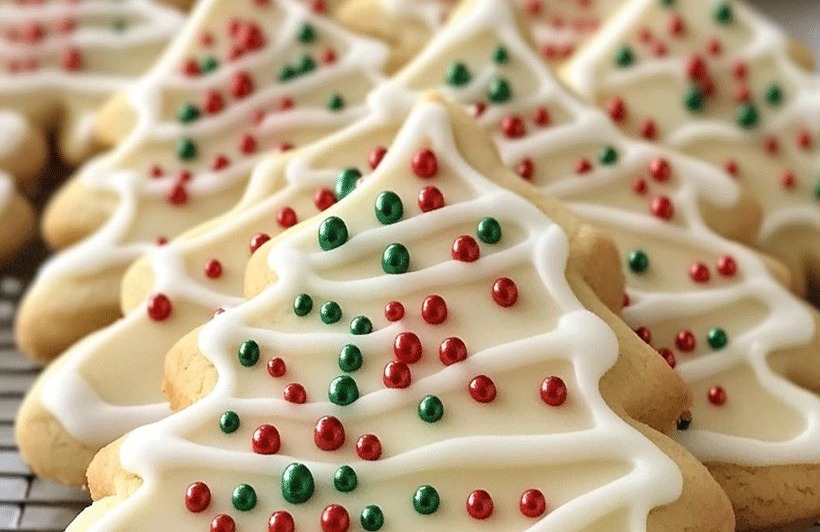
Embrace the holiday spirit with these incredibly soft Christmas cookies, boasting delicate spices and a tender texture, ideal for festive gatherings and joyful sharing.
Ingredients
- 1 cup (2 sticks) unsalted butter, softened
- 1 1/2 cups granulated sugar
- 2 large eggs
- 1 teaspoon vanilla extract
- 3 cups all-purpose flour
- 1 teaspoon baking powder
- 1/2 teaspoon salt
- 1/2 teaspoon ground cinnamon
- 1/4 teaspoon ground nutmeg
- 1/4 teaspoon ground cloves
- For the Glaze:
- 2 cups powdered sugar
- 3-4 tablespoons milk (or water)
- 1/2 teaspoon vanilla extract
- Optional: Food coloring, sprinkles for decoration
Instructions
- In a large bowl, cream together the softened butter and granulated sugar with an electric mixer until light and fluffy, about 3-4 minutes.
- Beat in the eggs one at a time, mixing well after each addition. Stir in the vanilla extract.
- In a separate bowl, whisk together the flour, baking powder, salt, cinnamon, nutmeg, and cloves.
- Gradually add the dry ingredients to the wet ingredients, mixing on low speed until just combined. Do not overmix.
- Divide the dough into two equal portions, flatten each into a disc, wrap tightly in plastic wrap, and refrigerate for at least 1 hour (or up to 2 days) to chill thoroughly.
- Preheat your oven to 375°F (190°C). Line baking sheets with parchment paper or silicone baking mats.
- On a lightly floured surface, roll out one disc of dough to about 1/4 inch thickness. Use your favorite Christmas cookie cutters to cut out shapes.
- Carefully transfer the cut-out cookies to the prepared baking sheets, leaving about 1 inch between them.
- Bake for 8-10 minutes, or until the edges are lightly golden. Do not overbake to keep them soft.
- Let the cookies cool on the baking sheet for 5 minutes before transferring them to a wire rack to cool completely.
- While the cookies cool, prepare the glaze: In a small bowl, whisk together the powdered sugar, milk, and vanilla extract until smooth. Add more milk if needed for a thinner consistency, or more powdered sugar for a thicker one.
- Once the cookies are completely cool, drizzle or spread the glaze over them. Decorate with sprinkles immediately if desired, before the glaze sets.
- Let the glaze set completely before stacking or storing the cookies.
